Backing up a QNAP NAS With restic to Backblaze B2
Backing up a QNAP NAS With restic to Backblaze B2
Easy, fast and end-to-end encrypted backup of a QNAP NAS stored in the cloud at a fair price? Absolutely! Meet restic an open-source backup software with a great concept that many people trust. Paired with Backblaze B2 Cloud Storage, an affordable S3 storage, this makes a perfect combination for setting up an online backup solution. In this article I am going to walkthrough how I have setup the online backup for my QNAP NAS TS-451 using the Container station. Previously, I’ve had my online backup done with CrashPlan but since they’ve dropped support for personal backups I had to build a better solution.
Setting up Backblaze B2
First of all, you will need to create a Backblaze B2 account if you don’t already have one. Then, create a new private bucket that will hold your online backup data:
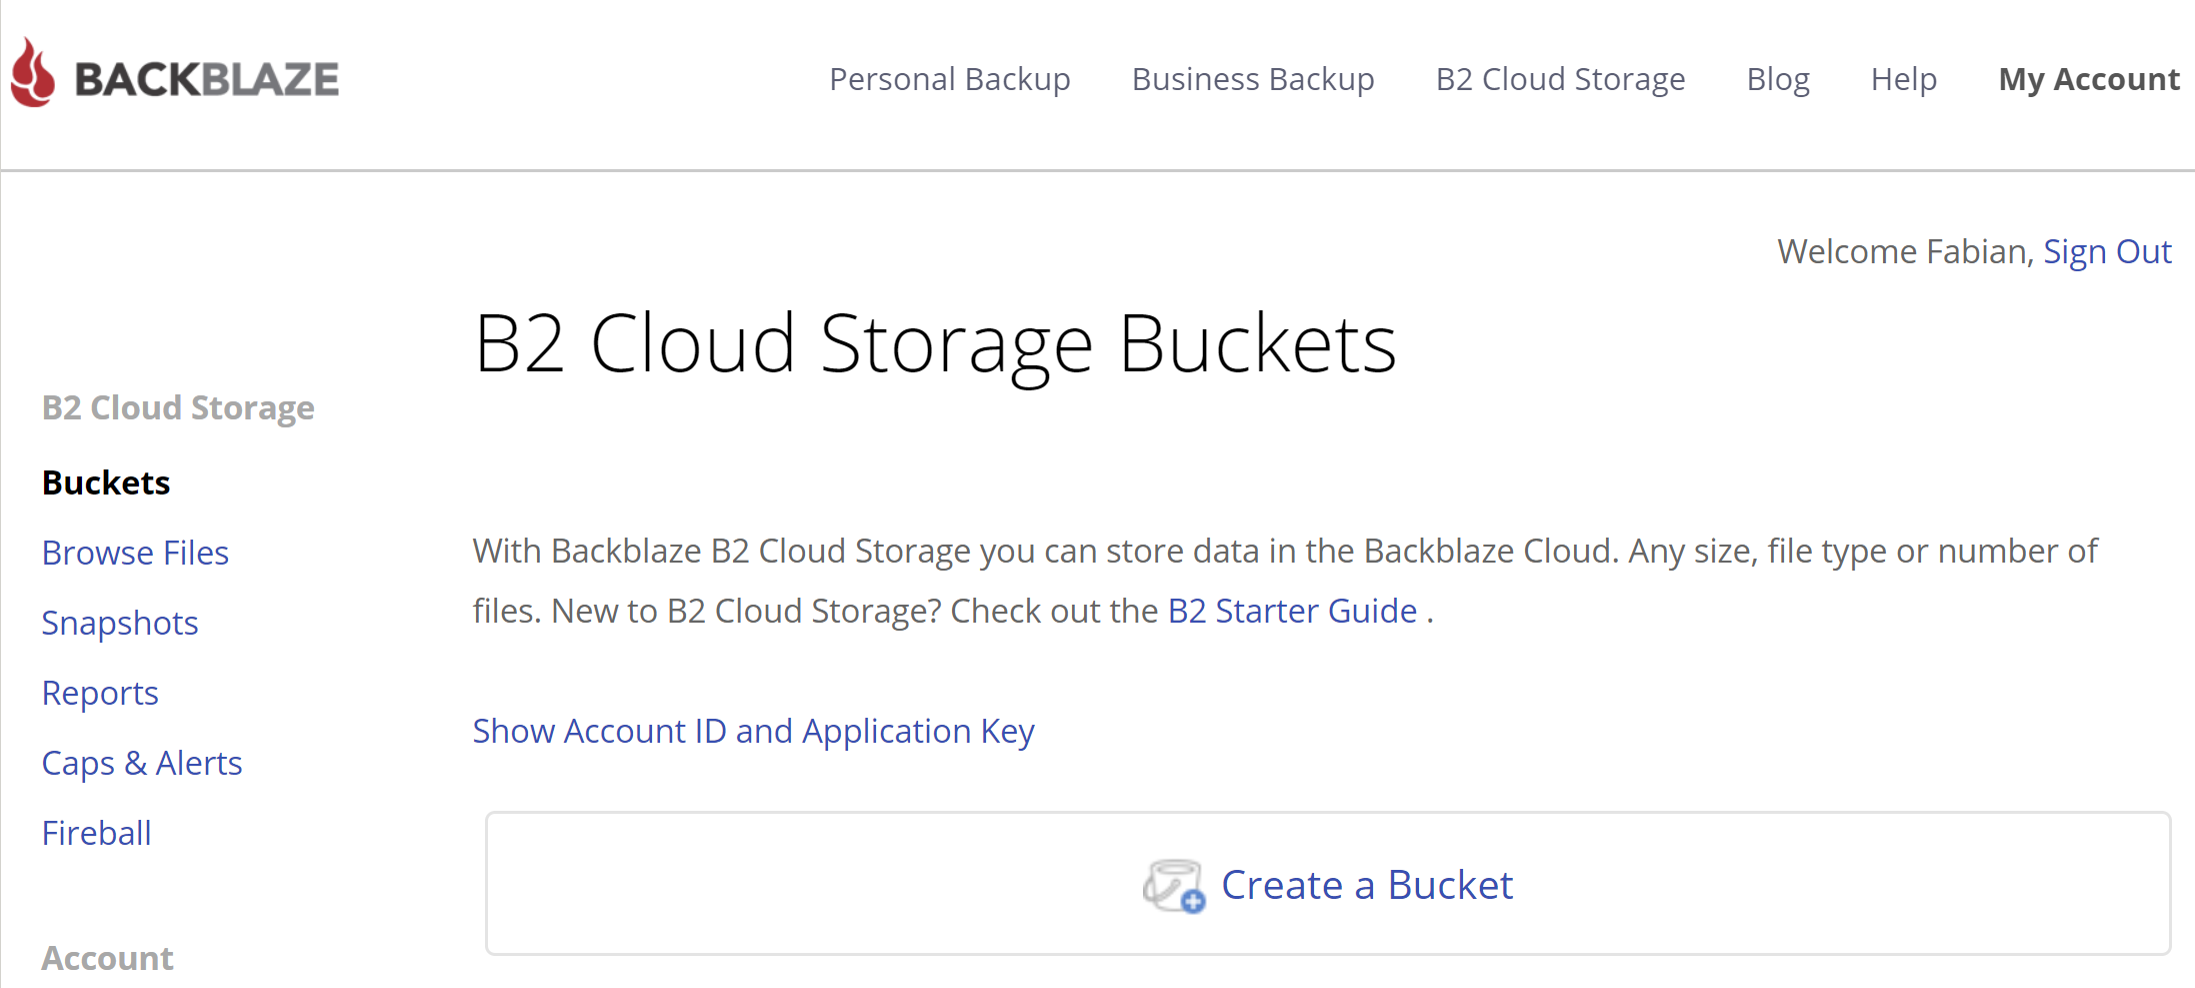
Right above the big “Create a Bucket” button is a small and nondescript link labeled “Show Account ID and Application Key” which we will use to create an access key for our restic client running on the QNAP. The access key should be limited to the specific bucket and if you intend to have multiple backups in the bucket, you could even set a backup-specific file name prefix:
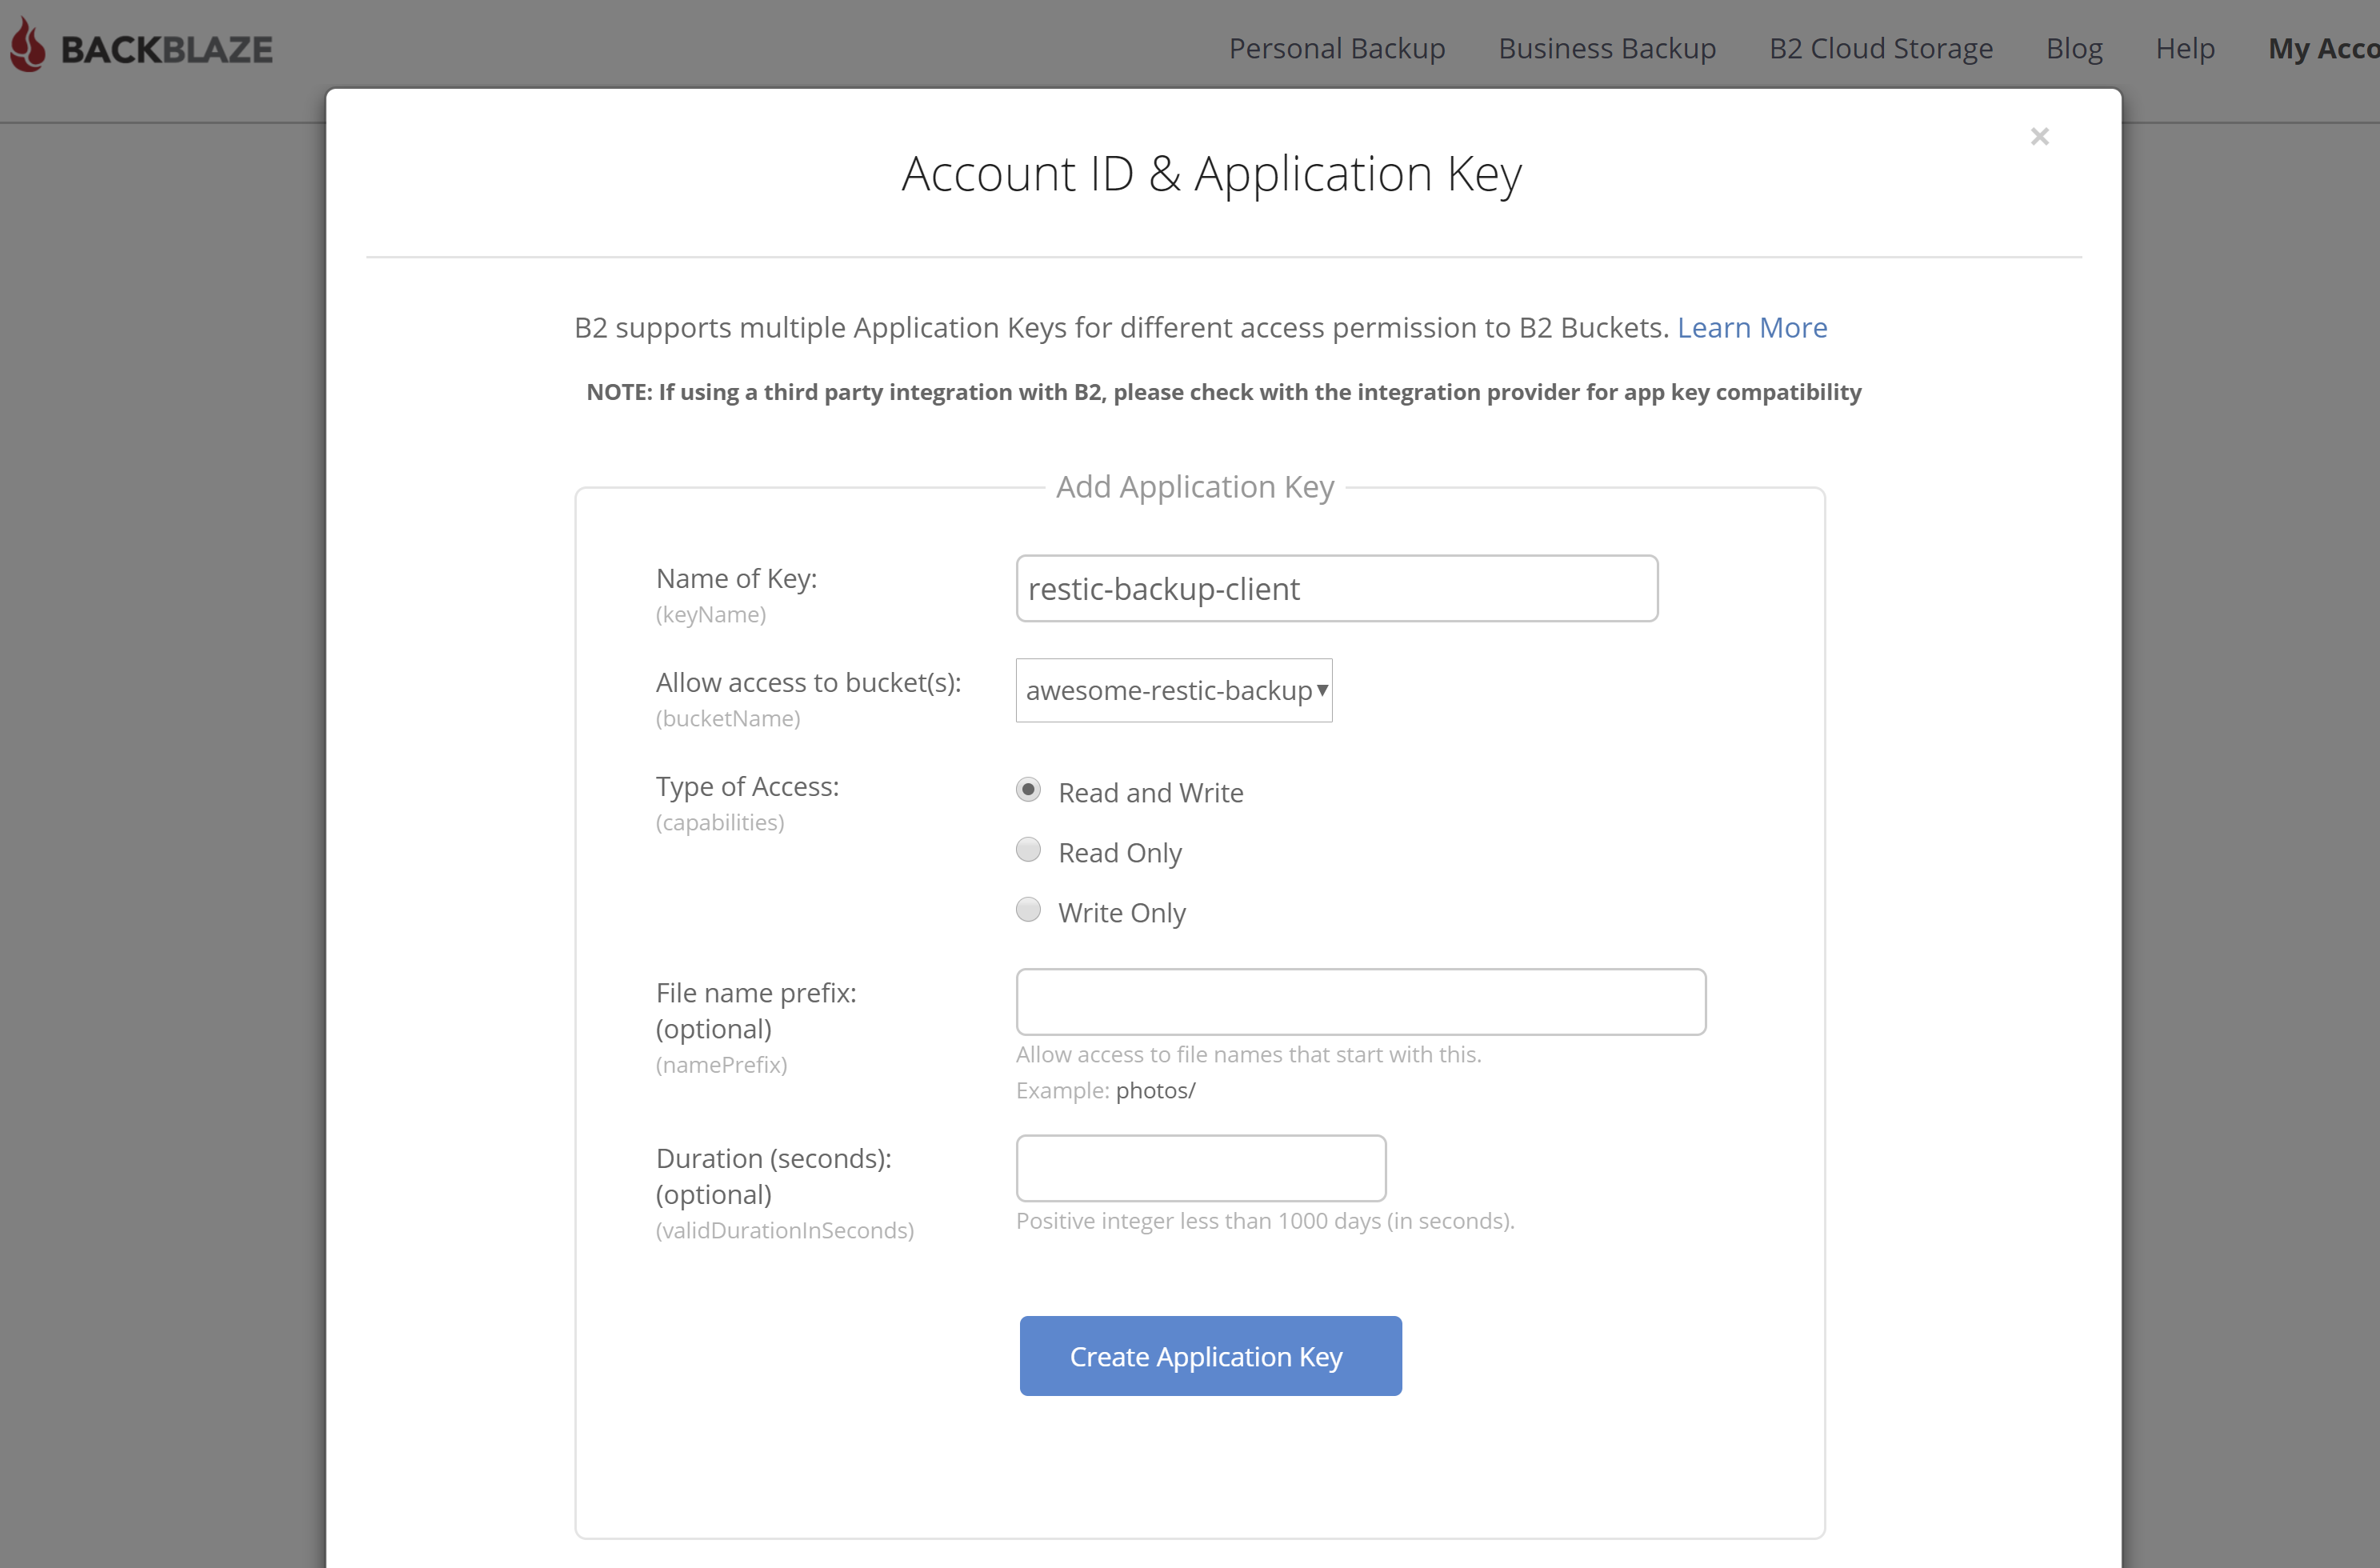
You will need to put the access key and the secret access key to your QNAP so make sure to store them in a safe place.
Initialize Restic Repository
Before we can use our new bucket to store backups we need to prepare a new restic repository in that bucket. You can prepare the repository from anywhere you can run restic (so not necessarily on the QNAP). If you intend to have a look at your repository from your workstation anyways, it may be a good idea to setup restic on your workstation anyways. So first, make sure restic is properly installed from wherever you would like to initialize the repository.
Once you’ve got the restic CLI you will need to supply the Backblaze B2 account login information. Here we’ll export the account and secret key we have generated before (no need for you master account key unless you want to):
$ export B2_ACCOUNT_ID=<MY_ACCOUNT_ID>
$ export B2_ACCOUNT_KEY=<MY_SECRET_ACCOUNT_KEY>
Then, the actual restic repository initialization is straightforward.
# command syntax: restic -r b2:<BUCKET>:<FOLDER> init
$ restic -r b2:awesome-restic-backup:qnap-backup init
enter password for new repository:
enter password again:
created restic repository 9172f1aab5 at b2:awesome-restic-backup:qnap-backup

Please note that knowledge of your password is required to access
the repository. Losing your password means that your data is
irrecoverably lost.
Restic can initialize the repository in a folder within the bucket, which I decided to do. In case you may want to backup another device you could back them all up to a single bucket having different restic repositories. However, restic also supports backing up multiple devices to a single repository so you may go through the pros and cons of backing up multiple files to a single repository for your specific use case.
You can now test whether the repository initialization was successful by checking if there are 0 snapshots:
restic -r b2:awesome-restic-backup:qnap-backup snapshots
enter password for repository:
repository 9172f1aab5 opened successfully, password is correct
ID  Time  Host        Tags        Paths
 ---------------------------------------
 ---------------------------------------
0 snapshots
Create Restic Backup Script
Time to create a backup!
The docker image provided by restic allows us to use docker run to execute a single command, which then runs in a new container.
We will use this approach to write a shell script that performs a single backup.
We can then create a cron job that will regularly perform the backup as required.
First steps first
The first step of the backup script is to define relevant files and folders through variables. We need to define some files and folders for restic to work, as well as all folders we actually do want to backup:
#!/bin/sh

# we'll mount this directory as restic cache
DIR_CACHE=$(readlink -f ./cache/)
# restic credentials are stored here and loaded by Docker
RESTIC_CREDS_FILE="./.restic.env"
# restic exclude file to skip backing up certain files and folders
EXCLUDE_FILE=$(readlink -f ./restic-excludes.txt)

# create an environment variable for each root folder to backup
DIR_BACKUP_HOMES=$(readlink -f /share/homes)
DIR_BACKUP_ARCHIVE=$(readlink -f /share/archive)
# ...
Before we actually launch a backup, let’s first make sure that the directories exist and are accessible. This prevents erroneous backup runs that could potentially go unnoticed for quite some time.
# check creds file
if [ ! -f $RESTIC_CREDS_FILE ]; then
    PWD=$(pwd)
    echo "Couldn't locate restic credentials in ${RESTIC_CREDS_FILE} in working directory '${PWD}'"
    exit 1
fi

# check backup locations
for location in $DIR_BACKUP_HOMES $DIR_BACKUP_ARCHIVE
do
    echo "Checking backup location ${location}"
    if [ ! -d $location ]; then
        echo "Missing backup location ${location}"
        exit 1
    fi
done
The full backup script
Now that we are all set, we’ll launch the backup using docker run.
This will start a new Docker container including the restic CLI and start the backup.
After the backup is executed the container will be deleted.
Here is the full backup command, and we’ll then walk through the different parts:
# docker-perform-restic-backup.sh
echo "Restic creds file found"
echo "Cache directory: ${DIR_CACHE}"
echo "Exclude file: ${EXCLUDE_FILE}"
echo "Now launching container..."

# do the backup
docker run \
    --name restic \
    --memory 512M --cpus 1.0 \
    --tty --interactive \
    --detach --rm \
    --env-file $RESTIC_CREDS_FILE \
    -v "/etc/localtime:/etc/localtime:ro" \
    -v "/etc/timezone:/etc/timezone:ro" \
    -v "${EXCLUDE_FILE}:/etc/restic/restic-excludes.txt:ro" \
    -v "${DIR_CACHE}:/root/.cache/restic:rw" \
    -v "${DIR_BACKUP_HOMES}:/data/homes:ro" \
    -v "${DIR_BACKUP_ARCHIVE}:/data/archive:ro" \
    --log-driver syslog \
    --log-opt syslog-address=tcp://<QNAP_IP>:514 \
    restic/restic:0.9.3 \
    --verbose \
    backup /data \
    --exclude-file=/etc/restic/restic-excludes.txt
The docker configuration involves a lot of flags and volume mounts.
First, we define the size and shape of the Docker container with the memory, cpus, tty and interactive flags.
The lifecycle of the container is controlled using the detach and rm flags, which means that the container will run detached in the background (so not coupled to the shell you start the container from) and then destroy itself once finished.
The restic credentials are loaded via the env-file flag, which exposes the credentials defined in our file as environment variables within the container (which restic then can pick up).
Volume mounts explained
Let’s have a look at the various volume mounts that are explained in the backup script:
    -v "/etc/localtime:/etc/localtime:ro" \
    -v "/etc/timezone:/etc/timezone:ro" \
    -v "${EXCLUDE_FILE}:/etc/restic/restic-excludes.txt:ro" \
    -v "${DIR_CACHE}:/root/.cache/restic:rw" \
    -v "${DIR_BACKUP_HOMES}:/data/homes:ro" \
    -v "${DIR_BACKUP_ARCHIVE}:/data/archive:ro" \
To get date and time right, we simply mount the /etc/localtime and /etc/timezone files of the host (i.e. the QNAP NAS) into the container.
By doing so, all dates and times reported by restic have the same timezone as your QNAP (which is really useful :-) ).
Next, the a restic excludes file is passed into the container, so that we can manage and store the exclude configuration on the host file system.
restic keeps a cache on the local machine to speed up certain operations. To leverage the cache from within our container, we need to store it outside of the container (remember, the container is destroyed after each operation!). The cache is mounted into the default Unix cache location as per the documentation.
Last but not least, all directories to be backed up need to be mounted.
To keep things simple, the folders to be backed up are mounted under /data, so that restic can simply backup all files stored under /data.
Syslog explained
You may have noticed the docker run logging options in the backup script:
    --log-driver syslog \
    --log-opt syslog-address=tcp://<QNAP_IP>:514 \
The QNAP NAS can run a syslog server that accepts and persists log messages in the syslog format. The syslog server can be enabled in the QNAP control panel as follows:
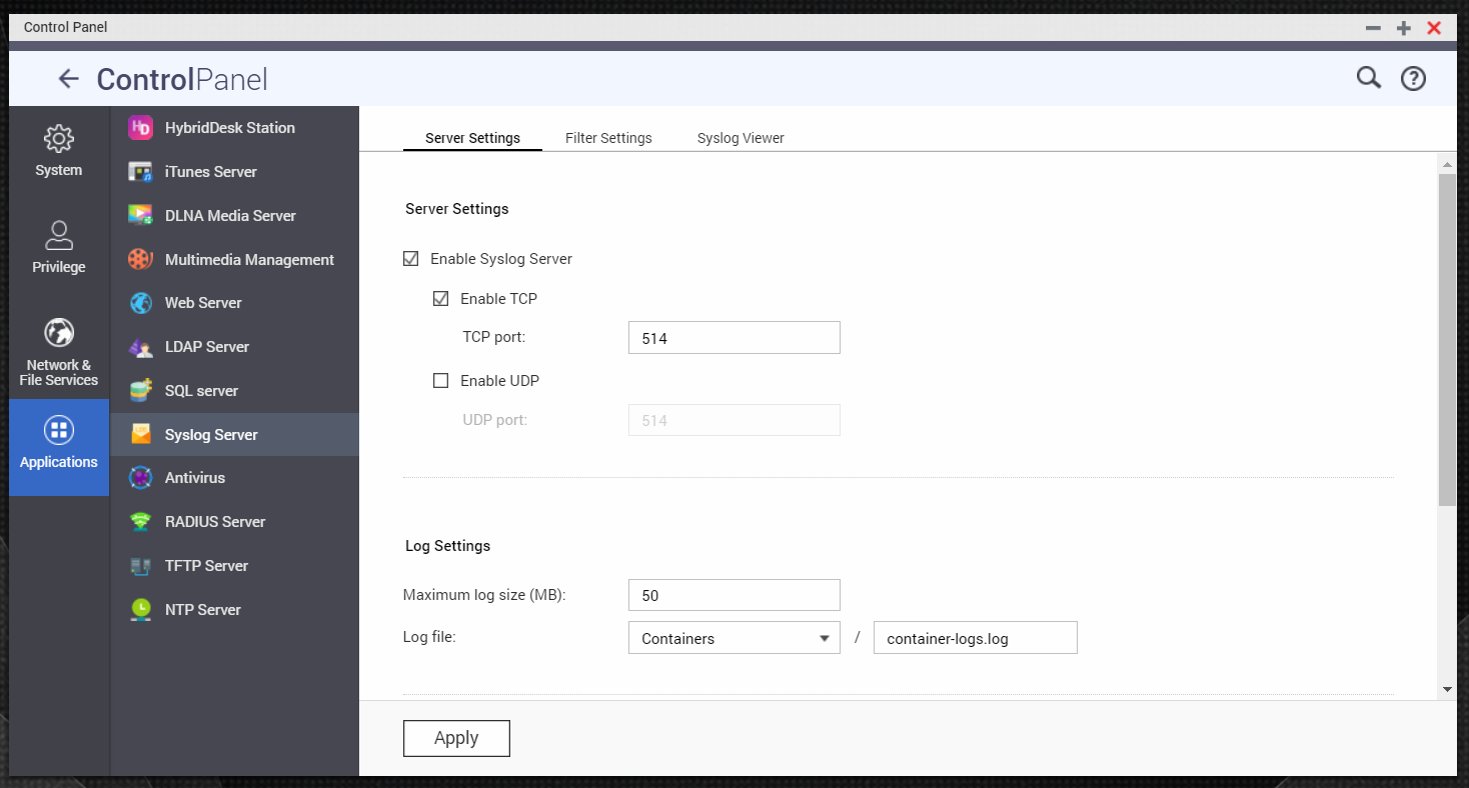
All restic backup logs are then persisted in the specified log file. To view the log files you can use the builtin syslog viewer (which is not that great) or simply inspect the files on the command line with the tools you are familiar with.
Running the backup
With the backup script in place, running the backup boils down to running the script:
$ ./docker-perform-restic-backup.sh
My restic backup currently stores around 1TB of data and from what I perceive the backup performance is very good.
Adding a Cronjob
On QNAP systems cronjobs cannot be added with the usual approach. Instead, it is required to edit the crontab file directly. Please see the wiki documentation on editing crontab files on QNAP for detailed information.
Once my initial backup was done I decided to run the backup every two days. To do so, I added the following line to my crontab file:
0 2 */2 * * /share/Containers/restic/docker-perform-restic-backup.sh
The cron pattern starts the backup at 02:00AM every two days. In case you want to adjust the crontab expression head over to crontab.guru which offers a nice visual way to experiment with crontab expressions.
Conclusion
restic is a great backup tool and works seamlessly from a QNAP NAS system to backup terabytes of data. The online backup solution with Backblaze and restic puts privacy first that you can trust as all the restic source code is open source. If you use a similar backup setup on your NAS leave a comment and share your experience!